How to edit real estate photos in lightroom serves as a crucial marketing tool in the property industry, allowing sellers to showcase their listings effectively. While capturing high-quality images is the first step, the significance of photo editing cannot be overstated. Editing is the process that transforms a good photograph into a great one, ensuring it stands out in a competitive market. The primary aim of editing in real estate photography is to enhance the image’s appeal while preserving its authenticity, thereby maintaining a realistic representation of the property.
Introduction to Real Estate Photography Editing
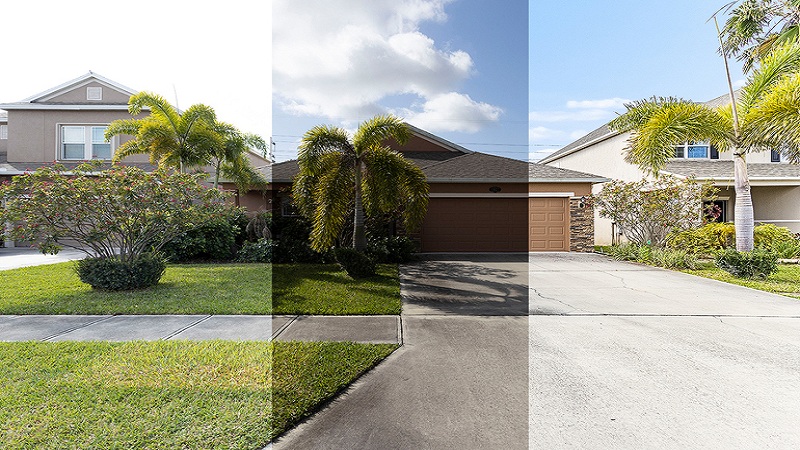
One of the main goals of editing is to enhance the visual appeal of the properties showcased. This involves adjusting elements such as brightness, contrast, color saturation, and sharpness to create an inviting atmosphere. The right edits can highlight the best features of a home, from its architectural details to the textures of materials used. By focusing on these aspects, potential buyers are more likely to envision themselves in the space, increasing the chances of a successful sale.
Furthermore, maintaining realism is vital in the editing process. Buyers are drawn to genuine representations of properties and can quickly detect exaggerated or over-processed images. Therefore, it is crucial to strike a balance that brings the best aspects of a home to light without drifting into unrealistic portrayals. For example, moderate adjustments to sky brightness or effective lens correction can significantly enhance an image without sacrificing its authenticity.
Ultimately, the editing phase is about ensuring that the property is presented in the best possible light. Properly edited images take into account not just aesthetic improvements but also the overall narrative conveyed through the photographs. By mastering the art of photo editing in real estate photography, agents and photographers can significantly increase engagement and attract potential buyers.

Understanding Lightroom’s Interface
Lightroom is an essential tool for photographers, and understanding its interface is vital for anyone looking to master real estate photography editing. When you first open Lightroom, you are greeted with a well-organized layout that is divided into various panels and modules, each designed for specific tasks. The primary components of the interface include the Library module and the Develop module, both of which serve unique functions in the editing process.
The Library panel is your starting point for organizing and managing your images. Here, you can import, sort, and categorize your photographs, making it easier to locate specific files when you need them. Photo editing features options for folders and collections, allowing you to streamline your workflow. In addition, the central area displays your thumbnails, and you can select images to view in greater detail. This intuitive layout simplifies the process of managing numerous real estate photos, ensuring you maintain an efficient library.
Moving on to the Develop module, this is where the core editing takes place. The interface in this module consists of various adjustment panels located on the right side. These panels house essential tools such as exposure, contrast, highlights, and shadows, providing intuitive sliders that allow for precise adjustments. The left side includes a history panel, which keeps track of all edits made, enabling easy backtracking if necessary. Efficient navigation between these panels is key to enhancing your editing speed and ensuring you make the most of Lightroom’s powerful editing capabilities.
Overall, mastering the interface is crucial for photographers who wish to elevate their real estate images. Familiarity with the layout and functionality of Lightroom can significantly enhance your editing process, ensuring professional outcomes with optimal efficiency.
Importing Photos into Lightroom
Importing real estate photos into Adobe Lightroom is a crucial first step in streamlining your editing workflow. This intuitive process allows you not only to bring your images into Lightroom but also to organize them effectively right from the start. The organization of your photos can significantly improve efficiency during the editing phase and facilitate quick access to images when needed.
Begin by launching Lightroom and navigating to the “Import” option. Once the import window appears, you will have the opportunity to select the source of your photos, be it a memory card, an external hard drive, or a specific folder on your computer. For best practices, create dedicated folders for each property in your file structure. This helps maintain a clear separation between different projects, making it easier to locate specific images later.
Additionally, during the import process, consider using keywords and collections. Adding relevant keywords such as the property type, location, and any distinctive features helps streamline searching capabilities within Lightroom. This can be particularly useful when handling a large number of photos, as it allows you to quickly filter and find images pertinent to specific marketing needs or client requests.
Furthermore, Lightroom allows for the addition of metadata during the import process. Incorporating data such as the camera settings, date, and geographic location can further enhance the organization of your workflow. By taking these initial steps to carefully import and categorize your real estate photos, you lay a solid foundation for a smooth editing process, enabling you to focus more on creativity and less on searching for files later on.
Basic Adjustments: Cropping and Straightening
In real estate photography, achieving proper composition is crucial for creating visually appealing images that attract potential buyers. One of the fundamental skills you need to develop when editing in Lightroom is cropping and straightening your photos. By mastering these techniques, you can enhance the overall quality of your images significantly.
Cropping allows you to focus on the most compelling aspects of the image while eliminating distractions. When cropping, it is essential to consider the rule of thirds, a fundamental principle in photography that suggests dividing the frame into a grid of nine equal parts. By positioning key elements along these lines or at their intersections, you can lead the viewer’s eye and create a more balanced composition. Additionally, while cropping, remember to maintain your desired aspect ratio to ensure that the final image adapts well to various platforms, whether you plan to use them for online listings or printed materials.
Straightening your images is equally important, especially when photographing interiors and architectural elements. Images that appear tilted can detract from the professionalism of the listing and may create a sense of unease for viewers. In Lightroom, you can utilize the ‘Crop Overlay Tool’ to adjust the angle of your photo. A simple adjustment can ensure that vertical lines, such as walls and doorframes, appear straight, giving your image a polished look.
By prioritizing these basic adjustments—cropping and straightening—you can greatly enhance the visual impact of your real estate photography. These straightforward tools, when used effectively, can transform a standard image into a captivating visual representation, ultimately improving the attractiveness of any real estate listing.
Enhancing Colors and Exposure
When undertaking real estate photography, achieving the right balance of colors and exposure is crucial for showcasing properties effectively. The adjustment of exposure involves fine-tuning the overall brightness of the image, which can significantly impact the viewer’s first impression. To start, use the exposure slider in Lightroom to increase or decrease brightness as needed. Pay close attention to the histogram, as it serves as a visual guide to ensure that you are not overexposing or underexposing your image.
Similar adjustments can be made with the contrast slider, which impacts the difference between the darkest and lightest areas of the photograph. Smooth contrast can enhance the depth of the image, providing a three-dimensional quality that is particularly appealing in real estate listings. Adjust the highlights to recover details in bright areas and use the shadows slider to reveal more information within the darker regions of the image. Furthermore, adjusting the whites and blacks is essential for defining the dynamic range of the photograph, allowing it to appear more polished and professional.
Additionally, the HSL (Hue, Saturation, Luminance) panel in Lightroom offers an advanced method for enhancing colors. Here, you can make specific adjustments to individual color components. For instance, by boosting the saturation, you can make the greens of gardens more vibrant or enhance the blues of the sky. Adjusting the luminance can help specific colors stand out without the need for introducing unnatural elements. This careful manipulation of HSL settings can transform average photographs into captivating visuals that highlight a property’s best features, ultimately leading to improved marketing outcomes.